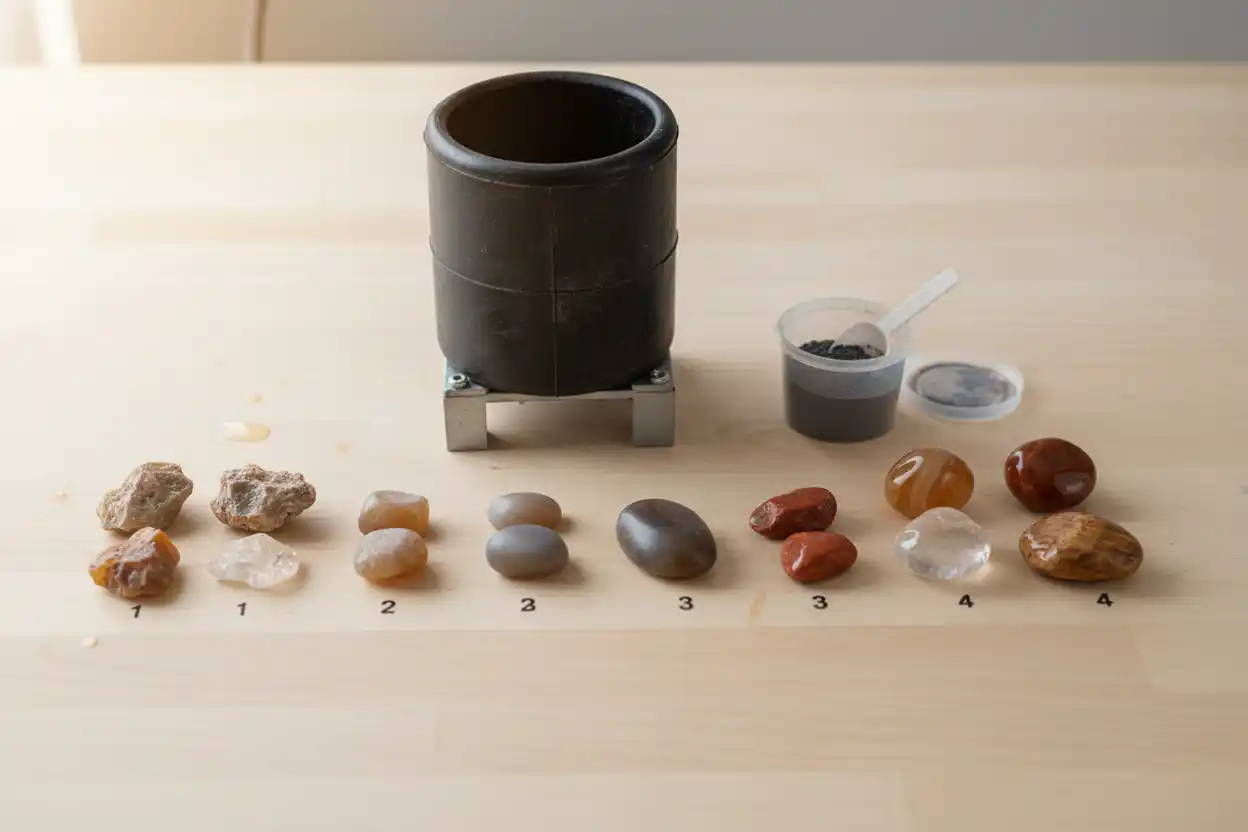
Rock Tumbling for Beginners: Best Stones, Grit and Steps
Rock tumbling transforms rough, weathered stones into smooth polished pieces by rotating them with abrasive grit, water and cushioning media. The process looks simple, but successful results depend on choosing compatible stones, maintaining the correct barrel load and preventing coarse grit from contaminating later stages.
Agate, jasper, petrified wood and many quartz varieties are reliable beginner choices because they combine suitable hardness with enough toughness to survive repeated collisions. Soft, cleavable, porous, metallic or chemically reactive minerals require different lapidary methods and can ruin an otherwise promising batch.
This guide focuses primarily on rotary tumblers, the most accessible machines for beginners. Vibratory tumblers use less grit and complete later smoothing stages more quickly, but they usually preserve the original shape rather than rounding rough material as strongly.
Rock Tumbling at a Glance
| Stage | Typical abrasive | Main purpose | Approximate starting time |
|---|---|---|---|
| Coarse grind | 60/90 silicon carbide or manufacturer equivalent | Round edges, remove pits and establish shape | About 7 days, repeated as needed |
| Medium grind | 120/220 or 220 silicon carbide | Remove coarse scratches and refine the surface | About 7 days |
| Fine grind or pre-polish | 500–600 grit silicon carbide or aluminum oxide | Remove medium-grit scratches and prepare for polish | About 7 days |
| Polish | Fine aluminum oxide, cerium oxide or manufacturer-specified polish | Develop the final reflective surface | About 7 days |
| Optional burnish | Water with a small amount of suitable soap | Remove polish residue and brighten a successful batch | A few hours |
These times are starting points. Barrel size, tumbler speed, stone hardness, rough quality and abrasive formulation affect the schedule.
The tumbler manufacturer’s instructions should take priority over any generic recipe.
How a Rotary Rock Tumbler Works
A rotary tumbler turns a rubber or plastic barrel slowly on horizontal rollers.
The stones rise along the rotating barrel wall and then slide or cascade through the load. Abrasive particles between the stones remove tiny amounts of material from high points, sharp edges and exposed surfaces.
Water creates a slurry that carries the grit and removed rock particles through the barrel. It also reduces airborne dust while the machine remains closed.
The process does not polish rough stones immediately. Coarse grinding shapes them first. Each later abrasive removes the scratches left by the preceding stage until the final polish can reflect light evenly.
A barrel that is too empty allows the stones to fall violently and chip. An overfilled barrel prevents sufficient movement. The correct load creates a steady rolling action rather than hard impacts or a solid mass rotating without internal movement.
Rotary Versus Vibratory Tumblers
A rotary tumbler is usually the better first machine.
It rounds stones, removes substantial surface material and can transform angular rough into pebble-like forms. The process is comparatively slow but forgiving when the barrel is loaded correctly.
A vibratory tumbler moves the load rapidly through a vibrating bowl. It removes less material and preserves corners, natural outlines and preformed shapes more effectively.
Vibratory machines are efficient for medium grind, pre-polish and polish, but many cannot shape coarse rough successfully without a prior rotary stage.
The two machine types also use different quantities of grit and water. Do not transfer a rotary recipe directly to a vibratory tumbler.
Equipment and Supplies
A basic rotary setup needs a tumbler, properly fitted barrel, compatible rough stones, silicon-carbide grit, polish, water and a cleaning area.
Ceramic media is useful for maintaining barrel volume, carrying abrasive into gaps and cushioning stones. Rounded cylinders work through all stages when cleaned thoroughly.
Plastic pellets are lighter and provide soft cushioning. However, abrasive can become embedded in them. Keep separate pellets for each stage rather than moving coarse-stage plastic into polish.
A dedicated sieve or colander helps separate stones from slurry. Buckets prevent abrasive mud from entering household plumbing.
Use a soft toothbrush, bottle brush and small cleaning tools for the barrel rim, lid recesses and stone pits.
The differences between natural rough and finished material are covered in Raw vs Polished Crystals.
The Best Rocks for Beginner Tumbling
The most dependable beginner stones are hard enough to accept polish, tough enough to resist bruising and reasonably free from deep fractures.
Quartz-based materials dominate beginner batches because many fall near Mohs 7 and polish with similar abrasives.
Agate
Agate is one of the best tumbling materials.
Its fine chalcedony structure takes an excellent polish, while bands, plumes, moss-like inclusions and translucent areas become more visible after smoothing.
Choose solid pieces without cavernous interiors or fragile crystal pockets. Thin fortification layers can undercut when softer material lies between harder bands.
Agate and jasper can often share a batch when their condition and hardness are similar.
Jasper
Jasper is another reliable choice.
Its opaque body can display red, yellow, green, brown, cream and black patterns after polishing.
Compact jasper tumbles well, but some commercial “jaspers” contain soft matrix, open fractures or mixed minerals. Test a small batch before filling a barrel with unfamiliar material.
Avoid pieces that crumble along pale seams or expose porous weathered areas.
Petrified Wood
Petrified wood commonly consists largely of quartz or chalcedony that replaced original plant tissue.
Sound material can polish beautifully and reveal grain, growth rings and cellular patterns.
Highly fractured pieces may break along original structural boundaries. Start with compact fragments whose edges do not flake under firm hand pressure.
Do not tumble specimens whose scientific, fossil or locality value would be reduced by removing their natural surfaces.
Clear and Milky Quartz
Clear quartz can develop a bright polish, although transparent pieces expose internal fractures clearly.
Quartz chunks tend to bruise when the barrel is underfilled or contains large size differences.
Use abundant cushioning media during later stages. Remove any piece that develops fresh white impact marks or opens along an internal fracture.
Milky quartz is more forgiving visually because small internal damage is less obvious.
Rose Quartz
Rose quartz is popular for pale-pink tumbled stones.
Choose material with even color and limited surface fractures. Heavily cracked rough can shed sharp fragments that damage neighboring stones.
Rose quartz may require more than one coarse cycle to remove weathered surfaces and produce rounded forms.
Its final polish can range from vitreous to softly glossy depending on material quality and preparation.
Amethyst
Amethyst is purple quartz and can be tumbled with other quartz-based rough of similar durability.
Crystal points lose their natural terminations, so avoid tumbling collectible specimens.
Pale or fractured material may chip, while dark color zoning can create attractive irregular patterns.
Keep the barrel well cushioned and avoid extreme size differences.
Tiger’s Eye
Tiger’s eye can develop a strong moving chatoyant band after polishing.
Use solid pieces without loose fibers, surface alteration or open seams.
The orientation of the fibrous structure affects the final optical effect. A random tumble shape may show chatoyancy differently from a deliberately oriented cabochon.
Cutting or grinding any silica-rich material creates dust, so rough preparation should remain wet and controlled.
Other Good Beginner Materials
Compact chalcedony, aventurine, quartzite and selected silicified rocks can perform well.
The exact trade name matters less than the material’s uniformity and durability.
A beginner should test unfamiliar rough in a small separate batch rather than mixing it immediately with proven agate or jasper.
The gemstone hardness chart helps estimate scratch resistance, but hardness alone does not determine tumbling success.
The gemstone toughness-versus-hardness guide explains why a hard stone can still fracture, while gemstone cleavage identifies minerals that split along structural planes.
Rocks Beginners Should Avoid
Soft and cleavable minerals grind away faster than quartz and can contaminate a mixed batch.
Calcite is soft, cleavable and acid-sensitive. It requires a specialized low-impact process rather than a standard agate recipe.
Fluorite has perfect cleavage and commonly chips into fresh flat surfaces.
Selenite is too soft and water-sensitive for ordinary wet rotary tumbling.
Malachite contains copper, can produce hazardous dust during lapidary work and is too soft for a quartz batch.
Pyrite is a metallic sulfide that can oxidize in wet conditions and contaminate the barrel.
Lapis lazuli is a mixed rock containing minerals with different hardness and chemical behavior. Standard coarse tumbling can undercut calcite areas and dull the surface.
Unknown ore minerals, fibrous specimens and materials containing arsenic, mercury, lead or other hazardous elements should not be placed in a hobby tumbler.
The toxic-crystals safety list provides broader handling cautions.
Is Obsidian Suitable for Tumbling?
Obsidian can be tumbled, but it is not the easiest beginner material.
Natural volcanic glass chips and bruises readily. Hard impacts create white crescent-shaped marks that remain visible beneath the polish.
Successful batches use stones of similar size, a well-filled barrel and generous ceramic or plastic cushioning during later stages.
Obsidian should be tumbled separately from hard agate and jasper. The quartz-rich stones can batter the softer glass.
Apache tears, snowflake obsidian and mahogany obsidian may each respond differently because inclusions and internal textures affect breakage.
Sort Stones Before Tumbling
Wash the rough and inspect every piece under bright light.
Remove stones with crumbly surfaces, deep pits filled with soft matrix, thin projections and fractures that open through the full piece.
Group materials by approximate hardness and durability.
Avoid combining a soft carbonate with hard quartz. The quartz will continue grinding while the carbonate disappears into slurry.
Size variation is useful when it allows small stones and media to fill spaces between larger pieces. However, one very large rock can strike small stones excessively.
A practical beginner batch contains several sizes without one piece dominating the barrel.
The beginner crystal-identification guide can help separate unknown rough before it reaches the machine.
Step 1: Coarse Grinding
Fill the barrel to the manufacturer’s recommended operating level, commonly about two-thirds to three-quarters full after the stones and media settle.
Add coarse silicon-carbide grit according to the machine and abrasive instructions. Many rotary recipes use 60/90 grit.
Add water until it reaches approximately the bottom of the uppermost rock layer. The load should be wet but not floating in a barrel of excess water.
Seal the barrel carefully, clean grit from the rim and place it on the rollers.
Run the machine continuously unless the manufacturer directs otherwise. Check it during the first day for leaks, unusual heat, belt problems or a barrel that is no longer turning.
After approximately one week, open the barrel over a bucket. Rinse the stones in a separate container and inspect them.
Coarse grinding is complete only when the shapes are acceptable and unwanted cracks, pits and rough areas have been removed. It may take several repeated cycles.
Do not advance a badly pitted stone and expect polish to repair it. Later stages smooth scratches but do not remove major defects efficiently.
Why the Coarse Stage Takes the Longest
Coarse grit performs the actual shaping.
Every sharp corner, weathered surface and deep pit requires material removal. A one-week calendar does not guarantee that this work is finished.
Some stones become rounded after one cycle. Others need several weeks, with inspection and fresh grit between runs.
Remove pieces that have reached the desired shape so they are not ground unnecessarily while slower stones continue.
Maintain the barrel load with new rough or coarse-stage media whenever finished stones are removed.
A successful coarse stage determines most of the final result. Rushing it produces polished stones that remain pitted, angular or fractured.
Step 2: Medium Grinding
Clean the barrel, lid, gasket, stones and media until no coarse grit remains.
Even a few 60/90 particles can scratch every stone during later stages.
Return only sound stones to the clean barrel. Add medium grit, commonly 120/220 or 220 silicon carbide, according to product instructions.
Restore the correct barrel volume with clean ceramic media.
Add the recommended water and run the batch for approximately one week.
The stones should emerge smoother, with the coarse scratches replaced by a finer uniform surface.
Any stone that breaks, chips or exposes a deep pit should be removed. It may need to return to the coarse stage in a separate load.
Step 3: Fine Grind or Pre-Polish
Cleanliness becomes even more important before pre-polish.
Use separate brushes or inspect cleaning tools carefully so coarse particles are not carried forward.
The pre-polish may use 500- or 600-grade silicon carbide, fine aluminum oxide or a manufacturer-specific compound.
Run the barrel with sufficient cushioning media to prevent bruising.
After the stage, dry one stone completely and inspect it under strong light. A properly prepared surface should look smooth and may show a soft satin sheen.
Visible scratches, chips or grainy areas indicate that the batch is not ready for polish.
Repeat the pre-polish or return damaged stones to an earlier stage instead of wasting polish.
Step 4: Polishing
Polish works only on a well-prepared surface.
Place the fully cleaned stones, barrel and dedicated polishing media together. Add the recommended quantity of high-quality rock polish and enough water for proper movement.
Aluminum oxide works for many quartz-based stones. Cerium oxide and other compounds are useful for selected materials, but product and stone compatibility matter.
Run the barrel for approximately one week or according to the polish instructions.
Rinse one test stone and allow it to dry. A true polish remains reflective when dry. A stone that looks shiny only while wet is not fully polished.
If the batch remains dull, the cause is often incomplete pre-polishing, contamination, poor-quality polish or incompatible stones rather than insufficient polishing time alone.
Optional Burnishing
Burnishing cleans residue from a successful polish.
Return the polished stones to a thoroughly clean barrel with clean media, water and a small amount of suitable soap.
Run the load for a few hours rather than another full abrasive stage.
Burnishing cannot repair scratches, pits or an incomplete pre-polish. It only removes film and slurry trapped on an already polished surface.
Avoid aggressive detergents, powders containing abrasive particles and large quantities of soap that create excessive foam.
Cleaning Between Stages
Cross-contamination is one of the most common causes of failed polish.
Coarse grit can hide in lid grooves, barrel seams, rubber surfaces, stone pits and ceramic-media holes.
Rinse the barrel over a bucket and scrub every recess.
Examine each stone. A fragment carrying a pocket of coarse grit can contaminate the next stage.
Do not clean tumbling equipment in a kitchen sink, bathroom sink or bathtub. Slurry hardens in plumbing and can cause expensive blockages.
Keep separate polish-stage media and, where practical, separate cleaning tools for the final stages.
Handling and Disposing of Slurry
Tumbling slurry contains pulverized rock and spent abrasive.
Never pour it into a household drain, toilet, storm drain or natural waterway.
Collect it in a bucket and allow the solids to settle. Water-management and disposal rules vary locally, so follow municipal requirements.
Keep the residue wet while handling it. Dry quartz-rich sludge can release fine silica dust when swept, poured or brushed.
Seal settled solids before disposal rather than allowing them to dry into airborne powder.
Wear eye protection during pouring and cleanup. Wash hands after handling unknown rough and abrasive compounds.
Preventing Bruising and Chipping
Maintain the correct barrel volume throughout every stage.
Add ceramic media when stones become smaller or when finished pieces are removed.
Avoid mixing very large and very small rocks without enough medium-sized material to cushion the load.
Separate brittle glassy materials from tough quartz-rich rough.
Remove sharp broken fragments immediately. They can continue striking neighboring stones.
Check machine speed. Excessive speed can produce violent impacts rather than a controlled rolling action.
A persistent white bruise usually will not disappear during polish. Return the damaged stone to coarse grinding or remove it from the batch.
Common Beginner Mistakes
Advancing Stones Too Early
A rough surface cannot be polished successfully merely by adding finer grit.
The coarse stage must remove major pits, cracks and weathered areas first.
Mixing Incompatible Materials
Hard quartz can destroy softer calcite, fluorite or glass.
Keep batches similar in hardness and toughness.
Underfilling the Barrel
An underfilled load falls rather than rolls, causing chips and bruises.
Overfilling the Barrel
An overfilled load lacks internal movement, so grinding becomes slow and uneven.
Using Too Much Water
Excess water thins the slurry and can reduce abrasive contact.
Poor Cleaning
One grain of coarse abrasive can scratch a polish-stage batch repeatedly.
Using Low-Quality “Polish”
Some kits label a fine grinding powder as polish. A true polishing compound is much finer than pre-polish grit.
Expecting Every Stone to Finish Together
Different pieces contain different flaws. Inspect them individually and move only ready stones forward.
How Long Does Rock Tumbling Take?
A simple batch may require four weeks after the stones complete one cycle per stage.
In practice, coarse grinding often takes several repeated weeks. A total of six to ten weeks is common for rough that needs significant shaping.
Time should be measured by surface condition rather than the calendar alone.
Machines designed for children sometimes rotate faster than traditional lapidary tumblers. Faster rotation does not necessarily produce better results and can increase bruising.
Patience is not an optional part of the process. Every later stage depends on the one before it.
Can Different Colors Be Tumbled Together?
Color does not determine compatibility.
Red jasper, green jasper and blue-gray agate may tumble well together because their hardness and structure are similar.
A red calcite and red jasper should not share a standard batch even though their colors match.
Dye can also bleed from treated rough and stain other stones or media.
When treatment is unknown, tumble one test piece separately or avoid placing it with valuable natural material.
The fake-crystal buying guide helps identify glass, resin and dyed products before processing.
Polishing Crystals Versus Preserving Natural Form
Tumbling permanently removes natural surfaces.
Crystal faces, terminations, etched growth patterns, mineral associations and locality evidence may disappear.
Do not tumble a specimen before considering whether its natural form has educational, collector or financial value.
Common broken quartz and weathered agate rough may improve dramatically. A complete amethyst point, pyrite cube or mineral-on-matrix specimen generally loses identity and value when rounded.
Photograph unusual rough before processing and preserve locality information.
Tumbler Placement and Electrical Safety
Place the machine on a level, stable surface where vibration cannot move it toward an edge.
Keep it away from water, flammable material and direct weather exposure.
Use a properly rated outlet and inspect the cord, switch, belt and rollers regularly.
The tumbler generates continuous noise and some heat. A ventilated workshop, garage or utility area is more suitable than a bedroom.
Follow the manufacturer’s duty-cycle instructions. Many rotary tumblers are designed for continuous operation, but a damaged or overloaded machine should never be left running.
Children should use tumblers only with adult supervision, especially during slurry handling and electrical setup.
Frequently Asked Questions
1. What are the easiest rocks for beginners to tumble?
Agate, compact jasper, sound petrified wood and many solid quartz varieties are dependable starting materials.
2. Can all rocks be tumbled together?
No. Stones should have similar hardness, toughness and chemical stability.
3. How full should a rotary tumbler be?
Most operate best roughly two-thirds to three-quarters full after rocks and media settle, but the machine’s instructions control.
4. How much water should be added?
A common starting point is water near the bottom of the top rock layer rather than completely covering the load.
5. How long does each tumbling stage take?
About seven days is common for rotary stages, but coarse grinding may need several repeated cycles.
6. Why are my polished rocks still dull?
They may have advanced before coarse scratches were removed, suffered grit contamination or received an unsuitable polishing compound.
7. Can beach stones go directly to polish?
Usually not. Smooth appearance does not mean their microscopic surface is ready for polish.
8. Can obsidian be tumbled with agate?
It is better separated because hard agate can bruise and chip the softer volcanic glass.
9. Can I reuse grit?
Spent grit breaks down and becomes less effective. Fresh abrasive is normally used for each new stage cycle.
10. Can tumbling slurry go down the drain?
No. It can settle and harden inside plumbing.
11. Do I need ceramic media?
It is not mandatory in every load, but it maintains volume, improves contact and reduces impacts, especially during later stages.
12. Is rock tumbling safe indoors?
The closed machine can operate indoors in a suitable ventilated utility area, but slurry must remain wet and dry silica-rich dust should not be generated or inhaled.
The difference between an average tumbled stone and a reflective polished one is rarely a secret product. It is usually careful rough selection, a patient coarse stage, compatible materials, adequate barrel volume and complete cleaning between grits. Once those fundamentals become routine, the tumbler becomes predictable rather than mysterious.
Rock and abrasive dust can harm the lungs. Keep slurry wet, avoid dry sweeping or grinding, wear appropriate protection during lapidary work and do not tumble unidentified hazardous minerals.