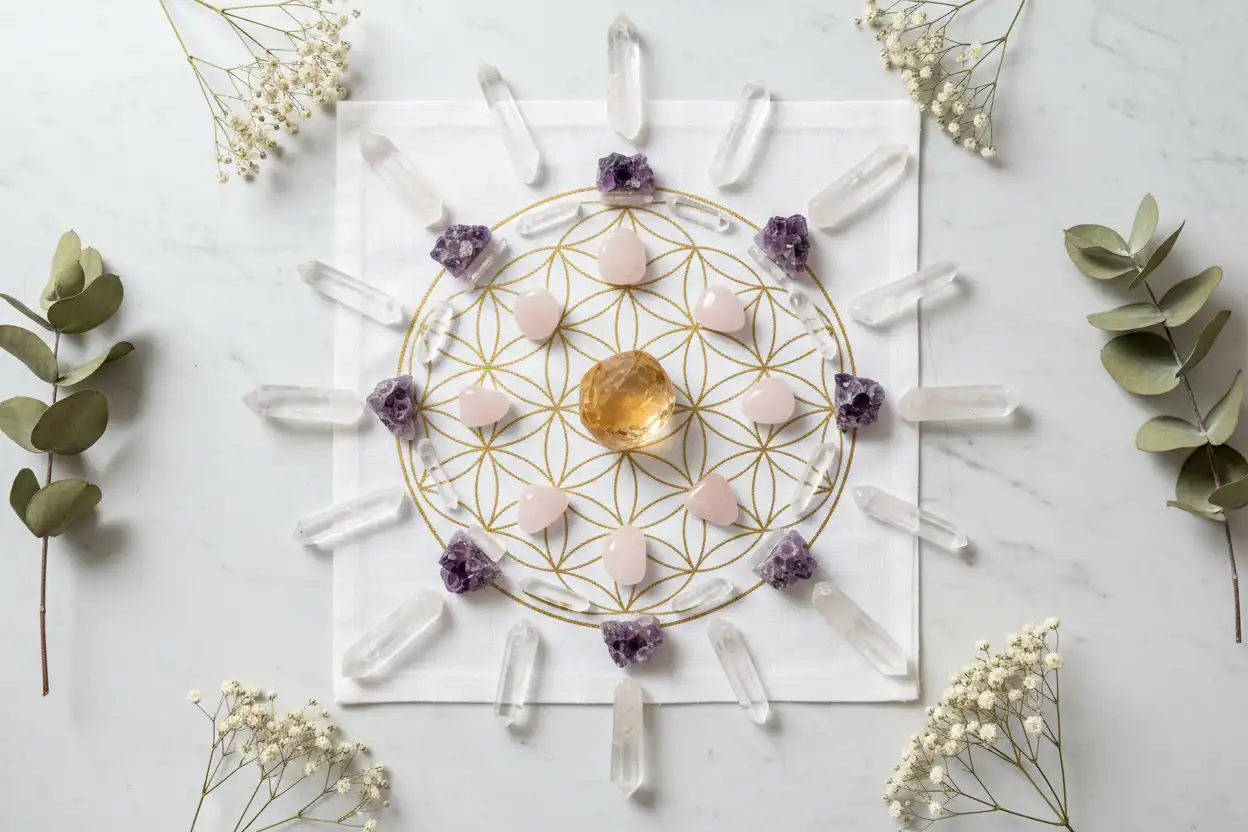
How to Make a Crystal Grid: Step-by-Step Guide
A crystal grid is an intentional arrangement of stones placed around a central idea, goal, value, or reflective practice. This crystal grid guide explains how to build one from beginning to end without requiring a large collection, an expensive board, perfect sacred geometry, or claims that crystals can control events.
At its simplest, a grid can consist of one central stone, four supporting stones, and a written intention. More elaborate layouts may include crystal points, boundary stones, circles, triangles, squares, spirals, hexagons, repeated patterns, or a dedicated board.
What makes the arrangement useful is not the number of stones. It is whether the purpose remains clear.
A crystal grid can visually organize an intention involving focus, creativity, relationships, boundaries, prosperity, study, meditation, transition, household routines, or another personal theme. However, there is no reliable scientific evidence that the geometry creates a measurable healing field, guarantees manifestation, attracts money, controls another person, or changes medical outcomes.
At Gems Lore, this crystal grid guide treats a grid as a symbolic and practical structure: define what matters, assign each stone a clear role, arrange the pieces safely, and connect the finished pattern with actions you can actually take.
Crystal Grid Guide at a Glance
| Grid element | Practical role |
|---|---|
| Intention | Defines what the arrangement represents |
| Center stone | Creates the principal visual focus |
| Supporting stones | Represent qualities related to the main intention |
| Directional points | Symbolize attention moving inward or outward |
| Boundary stones | Define the outer structure |
| Pattern | Organizes the stones visually |
| Written statement | Turns a vague wish into clearer language |
| Activation | Marks the beginning of the practice symbolically |
| Placement | Connects the grid with a useful environment |
| Practical action | Links symbolism with real behavior |
| Review date | Creates a point for evaluating progress |
| Maintenance | Keeps the physical stones safe and clean |
| Closure | Ends or redesigns the arrangement when its purpose changes |
A well-designed crystal grid guide therefore needs to cover more than where the stones go. Intention, ethics, material compatibility, safety, maintenance, and closure all matter.
What Is a Crystal Grid?
A crystal grid is a human-made arrangement of gemstones, minerals, glass, laboratory-grown stones, carvings, or other symbolic objects.
The stones may be placed in a circle, triangle, square, spiral, hexagon, line, concentric rings, or a freeform arrangement.
Some practitioners use several minerals.
Others repeat one material.
A simple grid may contain three supporting stones around a center. A larger arrangement might contain six, eight, twelve, or more pieces.
This crystal grid guide does not treat one number or shape as universally stronger.
Visual structure should serve the intention rather than become another rule to worry about.
Crystal Grid vs Crystal Lattice
A spiritual crystal grid should not be confused with a crystallographic lattice.
In mineralogy and materials science, a crystal lattice refers to the repeating three-dimensional structural arrangement associated with atoms, ions, or molecules in crystalline material.
That internal structure contributes to measurable physical properties.
A spiritual grid consists of complete stones arranged externally on a table, board, tray, or another surface.
The geometry does not reorganize their crystal lattices.
This distinction is important because a responsible crystal grid guide should not present spiritual symbolism as laboratory physics.
Crystal Grid vs Crystal Cluster
A crystal cluster forms through geological growth, while a grid is deliberately arranged by a person.
A quartz cluster may contain many natural crystal points connected through one matrix.
It can become the center of a grid, but the cluster itself is not automatically a crystal grid.
Clusters are often given symbolic meanings involving community or shared development because several crystals grow together.
Grids emphasize deliberate placement and assigned roles.
Neither form has been scientifically established as a medical healing field.
What Do You Need for a Crystal Grid?
A beginner following this crystal grid guide needs surprisingly little.
You need a safe, stable surface, one clear intention, a central object, and a few supporting stones.
An optional written note makes the intention easier to remember. Crystal points, a printed pattern, a wooden board, or a decorative cloth can be added if they improve the layout.
The stones do not need to be expensive.
They do not need to match.
They do not even need to be naturally mined.
Natural, laboratory-grown, treated, and imitation materials can all function as symbolic objects when accurately identified and physically safe.
The distinction matters for collecting and value, but a lab-grown quartz point does not become unsuitable for a personal grid merely because its origin is laboratory rather than geological.
Step 1: Choose One Clear Intention
The most important part of this crystal grid guide is choosing a purpose that is specific enough to influence behavior.
“I want good energy” is difficult to evaluate.
“I want to create a calmer evening routine” is clearer.
“I want success” is broad.
“I want to finish and submit my portfolio this month” creates direction.
A useful grid intention is:
- Focused mainly on your own actions.
- Realistic.
- Ethically framed.
- Short enough to remember.
- Specific enough to review later.
Avoid putting several unrelated goals into one arrangement.
A single crystal grid for sleep, money, romance, career, creativity, protection, and spiritual awakening may become visually impressive but conceptually unclear.
Use Ethical Intention Wording
A crystal grid should not be designed to override someone else’s choices.
Instead of:
Make this person love me.
Use:
I communicate honestly and respect the other person’s choice.
Instead of:
Make my manager promote me.
Use:
I prepare evidence of my work and communicate my professional goals clearly.
Instead of:
Cure my anxiety.
Use:
I follow appropriate care and practice one grounding routine consistently.
Instead of:
Guarantee money.
Use:
I review my finances and complete the actions within my control.
This crystal grid guide keeps consent and personal responsibility central because symbolic practice does not create authority over another person’s decisions.
Step 2: Write the Intention Down
Write the intention on a small piece of paper.
You can place it beneath the central stone, under the board, beside the grid, or inside an envelope underneath a movable tray.
Written wording reduces ambiguity.
It also makes later review easier.
If the grid remains in place for three weeks, you can compare the original intention with what actually happened rather than reconstructing the goal from memory.
For more structured intention-setting, how to program crystals explains how a stone can be assigned a symbolic purpose without claiming that the mineral itself understands instructions.
Step 3: Choose the Center Stone
The center stone represents the primary purpose of the arrangement.
Popular options include a clear quartz point, tower, sphere, polished palm stone, cluster, pyramid, cabochon, or personally meaningful piece of jewelry.
The center does not need to be the largest or most expensive object.
It simply needs to create a clear visual focus.
Clear quartz is popular because its transparent appearance is traditionally associated with clarity and its pointed crystal habit can create obvious visual direction.
Modern crystal traditions often describe quartz as an amplifier. Reliable evidence does not show that it scientifically strengthens another stone’s metaphysical properties.
In this crystal grid guide, clear quartz functions as a visual organizer rather than a supernatural power multiplier.
Center Stone Shapes
Shape changes the appearance and symbolism of the grid.
A sphere creates a balanced central form.
A tower creates a vertical focal point.
A natural crystal point emphasizes direction.
A pyramid creates a strong geometric center.
A cluster can visually represent several connected elements.
The broader crystal shapes meaning guide explains hearts, towers, points, spheres, pyramids, eggs, and wands in more detail.
Shape does not scientifically increase a stone’s healing ability.
Choose the form that makes the arrangement easiest to understand and maintain.
Step 4: Choose Supporting Stones
Supporting stones represent qualities connected with the central intention.
A focused-work grid might include clear quartz for clarity, fluorite for organization symbolism, tiger’s eye for practical confidence, citrine for constructive optimism, and smoky quartz for grounding.
A relationship-reflection grid might include rose quartz for compassion and rhodonite for accountability and boundaries.
A prosperity grid may include citrine, jade, and aventurine.
This crystal grid guide favors two to four supporting materials rather than a large collection of stones whose purposes become difficult to distinguish.
Every additional stone should answer one question:
Why is this piece here?
If there is no clear answer, it may not be necessary.
Crystal Grid Stone Ideas
| Intention | Possible stones | Grounded interpretation |
|---|---|---|
| Clarity | Clear quartz, sodalite, fluorite | Separate facts, assumptions and missing information |
| Focus | Clear quartz, tiger’s eye, fluorite | Choose one task and reduce distractions |
| Confidence | Carnelian, citrine, tiger’s eye | Prepare, act and review the result |
| Relationship reflection | Rose quartz, rhodonite, lapis lazuli | Compassion, boundaries and communication |
| Grounding | Smoky quartz, jasper, black tourmaline | Return attention to practical needs |
| Creativity | Carnelian, citrine, labradorite | Generate, experiment and complete work |
| Prosperity | Citrine, jade, aventurine | Review resources and take practical financial action |
| Transition | Moonstone, smoky quartz, clear quartz | Adapt while maintaining essential priorities |
| Reflection | Amethyst, howlite, celestite | Create quiet space and examine assumptions |
| Protection | Black tourmaline, smoky quartz, red jasper | Reinforce boundaries and practical precautions |
| Study | Sodalite, fluorite, clear quartz | Follow a schedule and active review method |
| Home | Agate, quartz, jade | Connect symbolism with maintenance and shared routines |
Traditional crystal meanings can inspire selection, but the stones do not guarantee the result assigned to the arrangement.
Step 5: Check Physical Compatibility
A crystal grid brings stones into physical contact or close proximity, so mineral compatibility matters.
Quartz can scratch softer calcite, fluorite, gypsum, pearl, and some other materials.
Pyrite can deteriorate under unfavorable humid conditions.
Satin spar and selenite are soft and should generally remain dry.
Celestite clusters can be brittle.
Apophyllite has prominent cleavage.
Fine zeolite specimens can shed fragile needles.
The crystals that should not be combined guide explains these practical incompatibilities.
This crystal grid guide recommends leaving a small gap between hard points and softer polished stones rather than pressing every piece tightly together.
Step 6: Check Toxicity and Handling Safety
Do not select a stone only because its color or traditional meaning suits the intention.
Some collector minerals contain lead, arsenic, mercury, copper, uranium, or other potentially hazardous components.
Others may be fibrous, flaky, powdery, crumbly, or sharp.
Before using an unfamiliar mineral, check the toxic crystals safety list.
For a frequently handled grid, polished and stable stones are often easier to manage than fragile mineral specimens.
Do not place hazardous minerals near food.
Do not use them in drinking-water rituals.
Do not grind or powder unknown specimens.
A good crystal grid guide should make physical safety more important than symbolic perfection.
Step 7: Choose a Stable Base
The grid can be built on:
- A wooden board.
- A ceramic tile.
- A cloth mat.
- A printed pattern.
- A tray.
- A framed design.
- A shelf.
- A plain tabletop.
A dedicated grid board is optional.
A tray with a raised edge can be particularly useful because the entire arrangement can be moved without rebuilding every position.
Avoid food-preparation surfaces and floors in walking areas.
Salt should not be assumed to be a universally safe grid base. It can attract moisture, abrade some surfaces, and affect certain minerals or metal components.
The most important requirement in this crystal grid guide is stability.
Step 8: Clean the Surface
Remove dust, residue, food, household spray, or grit before placing the stones.
Hard particles trapped underneath polished gems can scratch softer surfaces or the base.
Do not spray household cleaner over stones already arranged on the grid.
Clean the surface first, allow it to dry, and then place the materials.
If you use a fabric base, ensure it lies flat enough that spheres, points, or towers cannot roll or tip.
Step 9: Clean or Symbolically Cleanse the Stones
Physical cleaning and spiritual cleansing are different.
Physical cleaning removes dust, oils, residue, or dirt.
Spiritual cleansing is an optional symbolic practice used by some people to mark a fresh beginning.
The how to cleanse crystals guide explains why water, salt, sunlight, smoke, and other methods are not equally suitable for every material.
Low-risk symbolic methods include sound, visualization, or simply resetting the intention.
Water should not be used indiscriminately.
The crystals that can and cannot go in water guide explains mineral-specific limits.
This crystal grid guide does not require spiritual cleansing before a stone can be used.
Step 10: Position the Center Stone
Place the center stone over or beside the written intention.
Pause and restate the purpose.
For example:
This arrangement reminds me to work on this project clearly, consistently, and within the deadline I chose.
The wording can be ordinary.
A crystal grid does not become less meaningful because the statement is practical rather than mystical.
In fact, a simple sentence often makes the arrangement easier to use.
Step 11: Choose the Pattern
The geometry gives the stones a visible structure.
No pattern in this crystal grid guide is universally more powerful.
Choose one because its form fits the intention.
Circle Crystal Grid
A circle commonly symbolizes continuity, wholeness, community, containment, and recurring practice.
Place supporting stones around the center at approximately even or personally meaningful intervals.
A circle works well for meditation, shared values, ongoing routines, or reflection.
If several people are represented, do not use the arrangement to claim influence over them without consent.
Triangle Crystal Grid
A triangle creates a strong directional shape.
Its three positions might represent:
Preparation → Action → Review
or:
Idea → Experiment → Result
This crystal grid guide recommends triangles for focused goals because three positions force you to choose what matters most.
Square Crystal Grid
A square symbolizes structure, stability, foundations, and boundaries.
It works well for budgeting, work plans, study schedules, home routines, and protection symbolism.
Four stones might represent:
Resources → Responsibilities → Risks → Next Step
A square protection grid cannot physically secure a home.
Locks, maintenance, digital security, emergency preparation, and appropriate safety measures still provide real protection.
Hexagonal Crystal Grid
A six-sided layout creates balanced symmetry and works well when several roles need equal visual importance.
Hexagonal grids are commonly associated with connection, balance, or interdependence.
They can be useful for projects involving several related workstreams.
The geometry does not create a scientifically established frequency or energy field.
Spiral Crystal Grid
A spiral commonly symbolizes development, cycles, transitions, and movement.
Place stones from the center outward to represent expansion or from the outside inward to represent concentration.
Spirals can suit long projects, creative development, recovery from a transition, or gradual habit formation.
Leave enough space between stones for the pattern to remain visible.
Freeform Crystal Grid
You do not need standard sacred geometry.
A freeform layout can follow a line, path, personal symbol, memorial arrangement, color progression, or another meaningful design.
This crystal grid guide favors understandable personal symbolism over copying a complicated pattern without knowing why you are using it.
Do You Need Sacred Geometry?
No.
Sacred-geometry templates can provide attractive structure, but they are optional.
Some modern crystal boards use designs commonly called the Flower of Life or other geometric motifs.
These symbols may have varied historical, religious, artistic, and modern commercial interpretations.
Avoid assuming that every pattern has one universal ancient meaning.
You can build an effective symbolic grid using a plain circle drawn on paper.
The purpose matters more than owning a specialized board.
Step 12: Add Directional Crystal Points
Crystal points can be positioned inward, outward, or in alternating directions.
Inward-facing points may represent concentration, reflection, gathering information, or focusing several concerns on one goal.
Outward-facing points may represent communication, sharing, implementation, or moving an intention into practical action.
Alternating points can symbolize movement between receiving and expressing.
The direction remains symbolic.
A quartz point does not emit a scientifically verified metaphysical beam from its termination.
Step 13: Add Boundary Stones
Boundary stones create an outer perimeter around the central arrangement.
Black tourmaline and smoky quartz are common choices in grounding and protection traditions.
Red jasper or other durable stones may also be used.
A symbolic boundary works best when it corresponds to a real boundary.
A work grid might symbolize not answering nonurgent messages during focused time.
A relationship grid might represent ending a conversation if it becomes abusive.
A home grid might accompany an actual safety check.
This crystal grid guide treats protective symbolism as a reminder of precautions rather than a replacement for them.
Step 14: Activate the Crystal Grid
“Activation” is a spiritual term for formally marking the beginning of the arrangement.
One traditional method uses a clear quartz point.
Starting at the center, move the point toward each supporting stone and back again, then trace the outer pattern.
You do not need to physically touch delicate minerals.
Another activation can be much simpler.
Read the intention aloud.
Look at each stone and remember its assigned role.
Then complete the first practical action.
There is no reliable evidence that activation switches on a measurable energy field.
Within this crystal grid guide, activation is a transition from planning to use.
Step 15: Connect the Grid With Practical Action
This is the most important step after construction.
A crystal grid should remind you to do something.
| Grid intention | Practical action |
|---|---|
| Focus | Silence unnecessary notifications for a defined work period |
| Calm | Follow a consistent evening routine |
| Confidence | Rehearse before the conversation or presentation |
| Creativity | Schedule uninterrupted creation time |
| Boundaries | State the limit clearly |
| Prosperity | Review spending or complete an income-related action |
| Career | Submit a suitable application |
| Communication | Write the main point before speaking |
| Study | Complete active recall or practice questions |
| Transition | List what must change and what should remain stable |
A crystal grid guide becomes much less useful if every action is delegated to the stones.
The arrangement can hold your attention.
It cannot complete the work.
Focus and Productivity Crystal Grid
A simple productivity arrangement might use clear quartz at the center with fluorite, tiger’s eye, citrine, and smoky quartz around it.
Use a square pattern.
Assign the roles clearly:
Clear quartz represents the defined task.
Fluorite represents organization.
Tiger’s eye represents practical confidence.
Citrine represents constructive optimism.
Smoky quartz represents staying connected with present facts.
Place the crystal grid beside the workspace rather than in front of the keyboard.
Then schedule the work period.
Calm and Reflection Crystal Grid
An amethyst center stone can symbolize reflection.
Supporting stones might include rose quartz, smoky quartz, howlite, or celestite.
Use a circular layout if continuity and gradual transition fit the purpose.
Keep fragile clusters on a stable surface.
Do not place loose points, small stones, or heavy specimens inside bedding.
The wearing crystals to sleep guide explains why bedtime symbolism still requires physical safety.
This crystal grid guide does not present a sleep arrangement as treatment for insomnia.
Confidence Crystal Grid
Use carnelian as the center if the goal involves taking action.
Add citrine, tiger’s eye, red jasper, and clear quartz.
A triangle can represent:
Prepare → Act → Review
Connect the arrangement with something specific such as practicing a presentation, submitting an application, or having a delayed conversation.
The grid cannot guarantee approval or success.
Its value is making preparation and action visible.
Communication Crystal Grid
A communication grid can use sodalite or lapis lazuli at the center with blue lace agate, aquamarine, and clear quartz as supporting stones.
Use a balanced circle or square.
Write a short intention such as:
I communicate the facts clearly and listen to the response.
Do not use the grid to claim that another person will agree with you.
Communication requires participation from everyone involved.
Relationship Reflection Crystal Grid
A relationship grid should remain focused on your own behavior and boundaries.
Rose quartz may symbolize compassion.
Rhodonite can symbolize accountability and repair.
Lapis lazuli may represent thoughtful communication.
Smoky quartz can symbolize perspective.
An ethical intention might be:
I communicate honestly, maintain healthy boundaries, and respect mutual choice.
Avoid wording that attempts to make an ex return, force commitment, or create attraction.
This crystal grid guide treats consent as non-negotiable.
Prosperity Crystal Grid
A prosperity arrangement might use citrine at the center with jade and aventurine as supporting stones.
Traditional symbolism may associate these stones with prosperity, stewardship, and opportunity.
Connect each position with an actual resource or action.
One stone can represent income.
Another can represent expenses.
Another can represent savings.
A directional quartz point can represent the next financial action.
A prosperity grid cannot guarantee a raise, investment return, customer, lottery win, or business profit.
Use it to make money management more visible.
Protection Crystal Grid
A symbolic protection grid may use black tourmaline, smoky quartz, red jasper, or another durable grounding stone.
A square or concentric-ring pattern works naturally with boundary symbolism.
Then identify the real protection measure associated with the arrangement.
For home security, that might mean checking locks, smoke alarms, lighting, insurance, or emergency supplies.
For digital protection, review passwords and account security.
For relationship safety, maintain appropriate boundaries and seek support where needed.
The grid symbolizes protection.
It does not create physical immunity.
New Beginning or Transition Grid
For a transition, consider moonstone, smoky quartz, clear quartz, or another personally meaningful stone.
A spiral can represent gradual movement from an old situation into a new one.
Do not make every position about the desired outcome.
Reserve one position for uncertainty.
Another can represent resources.
Another can represent the first practical step.
This makes the crystal grid more realistic because transitions often contain unknowns.
Crystal Grid for Manifestation
Crystal grids are popular in manifestation practices.
The crystals for manifestation guide compares common stones used for that purpose.
A grounded manifestation grid separates intention from control.
You can define a goal and act toward it.
You cannot guarantee that external conditions or another person’s choices will cooperate.
This crystal grid guide recommends wording goals in observable terms and including a review date.
If evidence shows the strategy is not working, revise the strategy rather than concluding that the grid was not spiritually powerful enough.
How Many Crystals Should Be in a Grid?
There is no required number.
Three supporting stones can work.
Four can create a square.
Six create easy symmetry.
Eight can form a wider ring.
A beginner may find five to nine total pieces manageable.
Use fewer stones if the area is small, the minerals are fragile, the goal is simple, or too many materials make the arrangement visually confusing.
More crystals do not create more scientifically measurable power.
Clarity is usually more valuable than quantity.
Can You Use Only One Type of Crystal?
Yes.
A clear-quartz-only arrangement can create a visually consistent crystal grid.
You could also use several pieces of agate, rose quartz, jasper, or another durable material.
Each position can represent a different stage rather than a different metaphysical property.
For example, five quartz stones could represent:
Research → Plan → Begin → Review → Complete
A crystal grid guide does not require a large collection of different minerals.
Can You Use Jewelry?
Yes.
A ring, pendant, bracelet, or other meaningful piece can become the center or supporting object in a grid.
Make sure it will not become scratched, tangled, or damaged by surrounding stones.
Hard quartz points can scratch some softer gems.
Metal jewelry can also react differently to moisture, salt, household cleaners, or other materials.
If the piece is valuable, keeping it separated slightly from rough crystals is sensible.
Can You Use Lab-Grown Crystals?
Yes.
A laboratory-grown gemstone can serve perfectly well as a symbolic object.
Synthetic quartz, sapphire, or another lab-grown material has laboratory rather than geological origin, but symbolic meaning is personal rather than a measurable property dependent on mining.
The important requirement is accurate disclosure.
Do not pay a natural-gem premium for laboratory-grown material presented as mined.
For this crystal grid guide, natural origin, laboratory origin, and treatment matter primarily for identification, collecting, price, and physical care—not because one category has scientifically stronger spiritual energy.
Where Should You Put a Crystal Grid?
Placement should support the purpose while protecting the stones.
Desk
A small work grid can sit beside a notebook or monitor.
Keep it outside the keyboard and writing area.
Avoid rolling spheres or sharp points near the edge.
Meditation Area
Use a low stable surface where the arrangement is visible without requiring you to sit among sharp crystals.
Living Room
A decorative arrangement can work on a secure tray or protected shelf.
When a room is shared, respect the preferences of the people who use it.
Bedroom
Use stable, non-toxic materials on a low secure surface.
Do not place heavy specimens above a bed or small loose stones inside bedding.
Entryway
Boundary symbolism can suit an entrance, but the area often receives vibration, keys, bags, shoes, children, and pets.
Choose durable stones and a protected container.
Bathroom or Kitchen
These areas are generally less suitable because of water, humidity, food, steam, heat, and household chemicals.
Children and Crystal Grids
Small tumbled stones, beads, and chips can create choking hazards.
Crystal points can be sharp.
Large specimens can cause injury if they fall.
Unknown minerals may also create chemical or dust concerns.
Keep grids outside the reach of babies and young children unless the stones are specifically selected and supervised for safe educational handling.
A crystal grid should never be placed inside a crib or where a child may treat stones as pretend food.
Pets and Crystal Grids
Pets may knock stones over, chew them, lick salt-based displays, or drink from ritual bowls.
Cats can reach shelves that appear high enough to be safe.
Use enclosed cabinets or genuinely inaccessible surfaces where necessary.
Do not add crystal chips to pet water.
Do not attach stones to animals as a substitute for veterinary treatment, identification, training, or safety measures.
This crystal grid guide treats pets as a physical-safety consideration, not as participants who need energetic treatment.
Candles and Fire Safety
Candles are common in spiritual displays, but open flame adds unnecessary risk around paper, fabric, wooden boards, dried plants, resin objects, and unstable stones.
Heat can also damage some minerals and treatments.
Transparent spheres or polished quartz shapes may concentrate sunlight under particular conditions.
Avoid placing a grid where strong direct light can be focused onto combustible material.
A symbolic practice should never make basic fire safety less important.
Sunlight Safety
Some colored gemstones fade or change under prolonged intense light.
Amethyst, fluorite, kunzite, and some treated materials deserve particular care.
The crystals that fade in sunlight guide explains the differences.
A windowsill is therefore not a universally safe grid location.
Moonlight or sunlight is also not required for the arrangement to function as a personal symbolic practice.
How Long Should a Crystal Grid Stay Up?
There is no required duration.
This crystal grid guide recommends choosing a review date when the grid is built.
That could be:
One meditation session.
One week.
One month.
One project phase.
Until a defined action is completed.
A review date prevents the grid from becoming a permanent arrangement whose original purpose has been forgotten.
At the review, ask:
What action was completed?
What changed?
What did not change?
Is the original intention still relevant?
Should the grid remain, change, or close?
Maintaining a Crystal Grid
Dust accumulates.
Stones shift.
A goal changes.
Treat maintenance as part of the practice.
Use a hand blower or an appropriately soft brush for delicate arrangements.
Do not spray water or cleaning solution across the entire grid.
Every mineral may have different care needs.
Physical cleaning should follow the exact material, treatment, matrix, coating, glue, or jewelry construction.
Symbolic cleansing can use non-contact methods when that is personally meaningful.
A crystal grid guide that treats every stone identically risks damaging the collection.
What If Someone Touches the Grid?
Another person’s touch does not scientifically remove energy from a stone.
However, handling can disturb placement, leave skin oils, or damage delicate crystals.
If the exact pattern matters to you, simply rearrange it.
There is no need to assume that the entire grid has been spiritually ruined.
If the arrangement is in a shared household, explain that it is delicate rather than creating fear around touching it.
What If a Crystal Breaks?
Remove sharp fragments first.
Then consider the physical cause.
The stone may have fallen.
A pre-existing fracture may have propagated.
Heat or temperature change may have contributed.
Cleavage may have caused a clean break in certain minerals.
Do not automatically interpret breakage as proof that a crystal absorbed dangerous energy.
If the remaining piece is stable and safe, you may keep it.
If it is sharp, crumbly, or structurally unstable, store or dispose of it appropriately.
How to Dismantle a Crystal Grid
Closing a grid can be as deliberate as building one.
Read the original intention.
Review what happened.
Record completed actions, outside factors, and lessons.
Remove supporting stones carefully.
Remove the center stone.
Clean each material according to its own physical requirements.
Store stones so hard or pointed pieces do not damage softer ones.
Recycle, keep, or respectfully discard the written intention.
Finally, clean the base.
A goal that did not occur does not mean you lacked sufficient belief or assembled the grid incorrectly.
External circumstances and other people’s choices matter.
When to Redesign Instead of Dismantle
Sometimes the goal remains relevant while the plan changes.
In that case, revise the arrangement.
Perhaps one supporting stone represented an approach that failed.
Replace it with a stone representing the new strategy.
Maybe the intention was too broad.
Rewrite it.
Perhaps a large grid became difficult to maintain.
Simplify it.
This crystal grid guide treats revision as a normal response to new information rather than a failure of the original ritual.
Common Crystal Grid Mistakes
Using Too Many Stones
A crowded arrangement hides the pattern and increases physical compatibility problems.
Fewer pieces with clear roles are usually easier to understand.
Choosing a Vague Intention
“Bring positive energy” provides little direction.
Define what positive change would actually look like.
Trying to Control Another Person
A grid cannot ethically or scientifically force attraction, reconciliation, obedience, forgiveness, or agreement.
Focus on your own actions.
Ignoring Mineral Safety
Meaning does not override toxicity, hardness, cleavage, water sensitivity, light sensitivity, or fragility.
Expecting Stones to Replace Action
The arrangement cannot submit the application, finish the budget, schedule medical care, communicate the boundary, or complete the project.
Treating Every Result as Spiritual Proof
A favorable event is not proof that the grid caused it.
An unfavorable outcome is not proof that you lacked belief.
Evaluate ordinary causes and evidence.
Copying a Pattern Without Understanding It
You do not need to reproduce a social-media photograph exactly.
A simpler pattern with a purpose you understand is more useful.
Do Crystal Grids Really Work?
There is no reliable scientific evidence that a crystal grid independently changes external events, transmits healing energy, attracts money, creates protection, or guarantees manifestation.
That does not mean the arrangement has no possible personal value.
A grid can provide visual structure.
It can keep a goal visible.
It can turn several abstract ideas into separate physical positions.
It can mark the beginning of a routine.
It can support journaling or meditation.
It can make a review process easier.
Those functions do not require a supernatural mechanism.
This crystal grid guide therefore separates symbolic usefulness from claims that have not been established scientifically.
Frequently Asked Questions
What is a crystal grid?
A crystal grid is a deliberate arrangement of stones or symbolic objects in a geometric or personally meaningful pattern used for meditation, reflection, intention setting, decoration, or spiritual practice.
What is the purpose of a crystal grid?
The purpose is to represent one intention visually and organize supporting themes around it. A grid can help keep a goal or value visible but cannot complete the required action independently.
What do I need to make a crystal grid?
A simple crystal grid needs one clear intention, a stable surface, a center stone, and several supporting stones. A board, written note, directional points, or sacred-geometry template is optional.
Which stone should go in the center?
Choose a stable stone that clearly represents the main intention. Clear quartz is common, but any suitable stone or meaningful object can be used.
How many crystals do I need?
There is no required number. Three to eight supporting stones are enough for many grids, and beginners often find simpler arrangements easier to maintain.
Do I need sacred geometry?
No. A circle, square, triangle, spiral, line, or freeform pattern can work. Sacred-geometry boards are optional.
How do I activate a crystal grid?
Activation is a symbolic ritual. You may trace the pattern with a crystal point, visualize the connections, read the intention aloud, or simply begin the first action associated with the goal.
Does activation create measurable energy?
No reliable scientific evidence shows that activating a grid switches on a measurable spiritual or healing field.
Can crystal points face inward or outward?
Yes. Inward direction is often used symbolically for concentration, while outward direction may represent expression or implementation. The orientation does not create a scientifically established energy beam.
Can I use the same type of stone throughout the grid?
Yes. Repeating one material can create a simple, visually consistent arrangement. Different positions can represent different stages of the same goal.
Can I use lab-grown crystals?
Yes. Laboratory-grown gemstones can be used symbolically. Their origin matters for identification and value, but there is no evidence that mined stones have stronger metaphysical effects.
Can I use treated crystals?
Yes, provided they are physically suitable and accurately identified. Treatment can affect care, appearance, durability, or market value.
Can I put jewelry in a crystal grid?
Yes. Keep valuable jewelry separated from rough or harder stones that could scratch it.
How long should a crystal grid stay in place?
There is no fixed duration. Set a review date connected with the purpose, such as one session, one week, one month, or one project phase.
Can I move a crystal grid?
Yes. Moving the grid does not scientifically deactivate it. Building it on a stable tray or board makes relocation easier.
What happens if someone touches my grid?
Touch does not scientifically remove energy. Rearrange any stones that moved and clean them appropriately if necessary.
What if a stone breaks?
Handle sharp fragments safely and investigate physical causes such as impact, cleavage, fractures, or temperature change rather than assuming the break has supernatural significance.
Can a crystal grid make someone love me?
No. A crystal grid cannot create attraction, override consent, guarantee reconciliation, or control another person’s decisions.
Can a prosperity grid attract money?
There is no reliable evidence that a crystal grid independently attracts money. Use prosperity symbolism alongside practical financial actions such as budgeting, invoicing, saving, applying for work, or evaluating business costs.
Can a crystal grid protect my home?
It may carry protection symbolism, but it cannot replace locks, alarms, maintenance, insurance, emergency planning, or other real security measures.
Can a crystal grid heal anxiety or another medical condition?
No. Crystal grids are not medical treatments and should not replace healthcare or mental-health support.
Can all grid stones be cleaned together?
No. Minerals have different hardness, solubility, chemical composition, treatments, and structural weaknesses. Clean each stone according to its own requirements.
Can I leave a crystal grid in sunlight?
Not universally. Some stones and treatments can fade, heat up, or become damaged under prolonged strong light.
Can I use candles in a crystal grid?
Open flame creates fire and heat hazards around paper, wood, fabric, resin, and unstable minerals. A flame-free arrangement is safer.
How do I close a crystal grid?
Review the intention, record what happened, remove the stones carefully, clean and store each material appropriately, and clear the surface.
Let the Pattern Organize the Intention
A crystal grid does not need to be complicated to be meaningful.
One center stone can represent the main objective.
Four supporting stones can represent the qualities, resources, or actions needed to support it.
A written note can define the intention.
A review date can prevent the arrangement from turning into forgotten decoration.
That simple structure captures the most useful lesson in this crystal grid guide.
The stones make the intention visible.
They do not control the outcome.
A focus grid still needs focused work. A prosperity grid still needs sound financial decisions. A relationship grid still needs consent and communication. A protection grid still needs real precautions. A reflection grid can support quiet thought, but it does not replace healthcare when medical or psychological treatment is needed.
Choose physically safe stones, understand what each one represents, keep the arrangement stable, and avoid forcing spiritual rules onto materials whose physical care requirements differ.
Then connect the pattern with something you can actually do.
The most useful crystal grid guide is ultimately not about creating the most elaborate geometry. It is about building a clear enough arrangement that every time you see it, you remember the intention, the limits of the practice, and the next action that remains yours to take.
Disclaimer: Crystal-grid healing, manifestation, protection, chakra, energy, and attraction claims reflect cultural and contemporary spiritual traditions rather than established medical, physical, psychological, or financial effects. A crystal grid cannot control other people, guarantee outcomes, diagnose or treat health conditions, replace security measures or professional advice, or make hazardous minerals safe to handle. Keep small, sharp, fragile, toxic, and unstable specimens away from children and pets, and follow the physical care requirements of each material.