
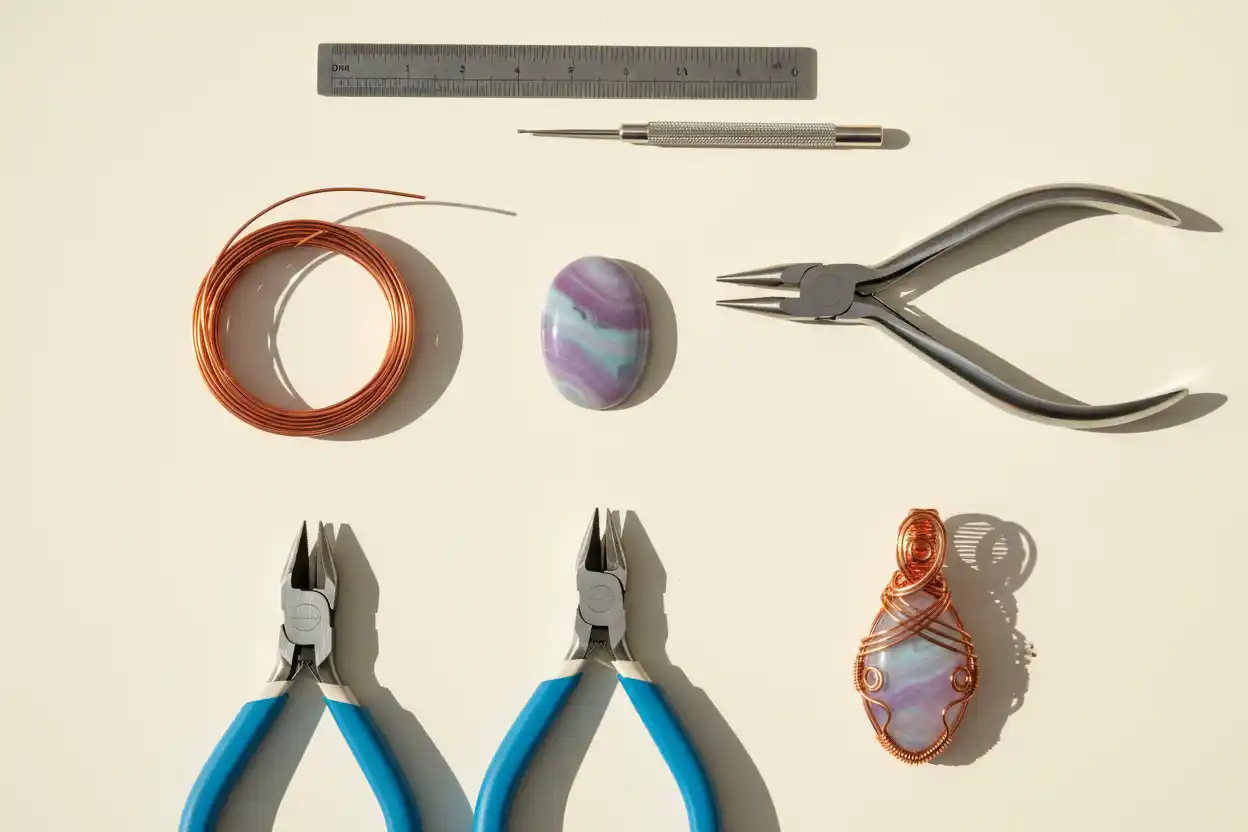

Wire wrapping turns a loose crystal into a pendant without drilling, gluing, soldering, or permanently altering the stone. A beginner-friendly cage uses several frame wires shaped around the crystal, a thin binding wire to hold them together, and a bail formed at the top for a cord or chain.
The most important part is not decorative spirals. It is constructing a cage that holds the stone securely without crushing it, scratching it, or allowing it to slip through an opening.
This tutorial uses round dead-soft copper wire and a smooth medium-sized stone. Once the basic structure is reliable, the same principles can be adapted to cabochons, flatter slabs, rough crystals, and more decorative wire patterns.
Choose the Right Crystal for Your First Wrap
Start with a smooth tumbled stone or thick freeform measuring roughly 25–40 millimeters long.
An oval, teardrop, rounded rectangle, or irregular shape with a visible waist is easier to secure than a perfect sphere. A slight narrowing gives the wires a place to grip.
Quartz, Agate, Jasper, and many compact Garnets are practical beginner materials. Avoid a valuable stone on the first attempt.
Do not begin with a highly cleavable, powdery, laminated, friable, heavily fractured, or extremely soft specimen. Fluorite, Calcite, Selenite, Kyanite, delicate crystal clusters, thin Opal, Pearl, and unstable matrix pieces can be damaged by concentrated wire pressure.
The gemstone hardness chart helps compare scratch resistance, while Gemstone Toughness vs Hardness explains why a moderately hard stone may still fracture.
Before wrapping an unknown object, use How to Identify Crystals and check whether it may be glass, resin, reconstructed material, or another stone through How to Spot Fake Crystals.
Choose Jewelry-Making Wire
Use wire sold specifically for jewelry or craft wire work.
Bare copper is inexpensive, widely available, and suitable for practice. It is easy to shape but gradually darkens through oxidation and may leave temporary discoloration on some skin.
Sterling silver, fine silver, gold-filled wire, brass, bronze, aluminum, and coated copper are alternatives. Each metal has a different balance of cost, springiness, work hardening, tarnish, and skin compatibility.
Nickel-containing wire may cause reactions in sensitive wearers. Avoid unidentified industrial or electrical wire, which may have unsuitable alloys, insulation, residue, or stiffness.
Treatments and coatings can change care requirements, just as they do with gems. The wider principle appears in Gemstone Treatments Explained.
Wire Gauge and Temper
A higher American Wire Gauge number indicates a thinner wire.
For this tutorial, use:
| Component | Recommended wire | Approximate diameter | Purpose |
|---|---|---|---|
| Main frame | 20-gauge dead-soft round wire | 0.81 mm | Forms the cage and bail |
| Smaller stone option | 22-gauge dead-soft round wire | 0.64 mm | Easier around small lightweight stones |
| Binding wire | 26-gauge dead-soft round wire | 0.40 mm | Secures the frame bundle |
| Decorative coils | 26- or 28-gauge wire | 0.40 or 0.32 mm | Adds wraps without excessive bulk |
Dead-soft wire bends easily and suits a first project. Half-hard wire retains shape better but is springier and less forgiving.
The wire becomes harder as it is bent, tightened, and manipulated. This work hardening helps the finished structure retain its shape, but repeated bending at the same point can eventually cause a break.
Do not use memory wire with normal flush cutters. It is hardened for a different purpose and may damage the cutting jaws.
Tools and Materials
You will need:
| Item | Function |
|---|---|
| Smooth crystal or tumbled stone | The pendant centerpiece |
| Three 45–50 cm lengths of 20-gauge dead-soft wire | Main frame and bail |
| One 25–30 cm length of 26-gauge wire | Central and upper bindings |
| Flush cutters | Producing a relatively flat wire cut |
| Chain-nose pliers | Gripping, bending, flattening, and tucking |
| Round-nose pliers | Making loops and controlled curves |
| Nylon-jaw pliers or soft cloth | Straightening wire with fewer tool marks |
| Ruler | Measuring consistent lengths |
| Needle file or cup burr | Smoothing cut ends |
| Painter’s tape | Temporarily controlling wire bundles |
| Safety glasses | Protecting against flying wire offcuts |
| Padded work mat | Protecting the stone and catching small pieces |
Flat-nose pliers can substitute for chain-nose pliers in some steps. Avoid heavily serrated jaws because they leave deep marks and can weaken plated or coated wire.
Set Up the Work Area Safely
Work over a clear table with a padded mat.
Wear safety glasses whenever cutting wire. A short offcut can spring unexpectedly.
Point the cut end away from your face and place a finger or cloth over the loose side before closing the cutters.
Collect every offcut immediately in a lidded container. Small sharp wire fragments are hazardous to children, pets, bare feet, and vacuum cleaners.
Tie back long hair and remove loose bracelets or sleeves that catch on tools.
Inspect the pliers before beginning. Misaligned or damaged jaws can slip and create sharp tool marks.
Step 1: Measure and Cut the Frame Wires
Cut three equal lengths of 20-gauge wire, each approximately 45–50 centimeters long.
A larger stone or long decorative bail may require more wire. It is easier to trim excess later than to extend a frame that is too short.
Keep control of the free end while cutting.
After each cut, smooth the ends with a needle file or cup burr. Run a fingertip carefully near—not directly across—the end to confirm that it no longer feels sharp.
Straighten each wire with nylon-jaw pliers or by drawing it through a folded soft cloth. Do not pull plated wire aggressively because the coating can stretch or wear.
Step 2: Align the Three Wires
Place the three wires parallel on the work mat.
Match their centers and use a short piece of painter’s tape on each side to keep the bundle aligned.
Arrange the wires so they lie evenly rather than crossing.
The center of this bundle will become the bottom support beneath the stone.
Check that similar wire lengths extend from both sides. Small differences are acceptable, but a strongly uneven bundle can make the bail difficult to center.
Step 3: Bind the Center
Cut approximately 25–30 centimeters of 26-gauge binding wire.
Place its midpoint behind the center of the three-wire bundle.
Wrap one end around all three frame wires three times, then wrap the opposite end in the same direction for another three turns. Alternatively, continue one tail for five or six neat coils.
Keep the wraps snug but not so tight that the frame wires overlap.
Use chain-nose pliers to press the coil gently into place.
Trim the binding-wire tails on the back of the bundle, smooth them, and tuck them so no sharp point remains exposed.
This central wrap will sit beneath the stone.
Step 4: Spread the Six Frame Ends
Remove the painter’s tape.
The three long frame wires create six free ends extending from the center wrap.
Spread these ends into three pairs, like six spokes around a wheel.
Aim for approximately even spacing, but let the shape of the crystal guide the final position.
One pair will support the front and back near one side, the second pair will support the opposite side, and the third pair will stabilize the remaining faces.
Do not create sharp kinks yet. Broad curves are easier to adjust and less likely to mark the stone.
Step 5: Seat the Crystal on the Base
Place the center binding flat on the work mat and set the bottom of the crystal directly above it.
Bring the six wires upward around the stone.
Position the wires so they cross stable parts of the surface rather than fragile points, thin edges, fractures, cavities, or peeling coatings.
The wires should meet near the top, above the widest part of the crystal.
Adjust the stone until its visual front faces outward and its weight sits centrally over the base wrap.
If the piece repeatedly rolls or slips, use a small folded cloth or removable tape to steady it while shaping the cage.
Step 6: Shape the Wire Cage
Use your fingers to curve each wire closely around the crystal.
Apply pressure to the wire, not directly through the stone.
A secure cage normally has support below the widest point and wires that narrow above it. The crystal should not be able to move downward, upward, or sideways through the gaps.
Space the wires deliberately so the design looks balanced from the front and back.
For a smooth oval stone, three evenly spaced pairs work well. An irregular specimen may need one pair moved toward a depression or natural waist.
Avoid crossing a wire over a prominent optical feature when possible. Labradorite flash, Amethyst zoning, Agate bands, and inclusions are often more visible when the front remains open.
The visual choices in finished pieces can be compared with Amethyst Necklaces and Pendants, Labradorite Necklaces and Pendants, Turquoise Necklaces and Pendants, and Garnet Necklaces and Pendants.
Step 7: Test the Cage Before Binding the Top
Hold the gathered wires securely and turn the piece over the padded mat.
Check every direction in which the stone could escape.
The gaps should be smaller than the narrowest part of the crystal that might pass through them.
Gently push the stone upward from the base. Then press it from side to side with minimal force.
If it shifts, reposition the frame wires before creating the top binding.
Do not compensate for a poorly designed cage by crushing the wires against the stone. Better spacing provides security with less pressure.
Step 8: Bind the Wires Above the Stone
Gather all six frame ends immediately above the stone.
Use approximately 10–15 centimeters of 26-gauge wire to wrap the bundle four to six times.
Keep the coil neat and tight enough to prevent the frame wires from spreading.
The binding should sit close to the stone without pressing into it.
Use chain-nose pliers to flatten and align the final coil. Trim the binding-wire ends at the back, smooth them, and tuck them inward.
Test the stone again before forming the bail. Once the bail is shaped, large cage corrections become more difficult.
Step 9: Form the Bail
Separate two central 20-gauge wires from the gathered bundle.
Place a round-nose plier jaw, bail-making plier, pencil, or small mandrel behind them.
Bend the two wires over the mandrel toward the back to create a loop large enough for the intended chain or cord.
A bail opening of approximately 4–6 millimeters suits many cords and fine chains, but measure the actual connector before finalizing it.
Bring the two wires down behind the pendant.
Wrap them around the neck below the bail two or three times, keeping the coils above the stone.
Trim the remaining ends, smooth them, and tuck them into a protected rear position.
Check that the bail faces in the correct direction. A pendant bail should normally allow the stone to hang flat rather than turning sideways.
Step 10: Finish the Remaining Frame Wires
The four remaining frame wires can be handled in several ways.
For the simplest finish, coil each wire around the base of the bail, trim it, smooth the end, and tuck it against the back.
For a decorative finish, create small spirals with round-nose pliers and position them on the front or sides.
Do not make a loose spiral that catches clothing or hair.
Every cut end must finish against another wire or in a recessed area. No sharp tail should point toward the wearer, the chain, or the stone.
Avoid repeated back-and-forth adjustment. Work-hardened wire can snap at a stressed bend.
Step 11: Perform the Security Test
Lay the pendant on the padded mat.
Check the following:
- The crystal cannot move through any opening.
- The bottom binding supports its weight.
- The upper binding does not slide.
- The bail remains centered and closed.
- No wire end scratches a finger or catches soft cloth.
- Decorative spirals do not lift away from the frame.
- The stone does not rattle when the pendant is moved gently.
- No wire presses into a fracture, cleavage edge, soft matrix, or coating.
Thread the intended cord or chain through the bail and suspend the pendant a few centimeters above the padded mat.
Observe whether it hangs upright.
Do not conduct the first test over a hard floor.
Step 12: Smooth and Clean the Finished Pendant
Use a needle file or cup burr on every exposed end.
For bare copper or sterling silver, wipe the wire with a clean jewelry cloth while avoiding excessive rubbing on the stone.
Do not apply metal polish across a porous, organic, coated, dyed, or soft gem.
Cleaning must follow the most sensitive component.
For example, How to Clean Amethyst Jewelry Safely permits more moisture than How to Clean Malachite Jewelry Safely or How to Clean Turquoise Jewelry Safely.
Labradorite’s cleavage requires the handling described in How to Clean Labradorite Jewelry Safely, while Garnet’s limits belong to How to Clean Garnet Jewelry Safely.
How Tight Should the Wire Be?
The wire should restrain the stone without crushing it.
You should not see the frame shifting freely, but the wire does not need to indent the surface.
Soft minerals, coatings, wax, resin, dye, and organic materials may be damaged by pressure that a Quartz pebble would tolerate.
If tightening one section creates a visible mark, stop and redesign the cage.
A secure wrap relies on geometry: support beneath the widest area, controlled gaps, a stable top binding, and a bail that does not spread.
Excessive force is usually evidence that the structure needs adjustment.
Choosing Wire for Different Stones
Quartz and Amethyst
Quartz is hard enough for most beginner wire-wrapping projects, although sharp crystal points and natural fractures still require care.
Place wires around the base or along broad prism faces rather than across delicate terminations.
Garnet
A polished Garnet can work well in a wire pendant.
Avoid high pressure on an included or fractured stone, and protect faceted edges from plier contact.
Labradorite
Labradorite is commonly wrapped because broad cabochons display attractive labradorescence.
However, its feldspar cleavage means the wire should be shaped gradually without sharp bending pressure against the stone.
Malachite and Turquoise
Both materials are relatively soft and frequently treated.
Use smooth wire, minimal pressure, and no aggressive polishing compounds. A bezel may offer better long-term protection than a beginner wire cage.
Amber, Pearl, and Opal
These materials demand substantially more care.
Amber and Pearl scratch easily, while Opal may have poor toughness, hydration concerns, or assembled construction.
A first project should use a more forgiving stone.
Wire Shape Options
Round wire is the easiest choice for a beginner because it curves smoothly and can be rotated without changing its visible profile.
Square wire nests neatly beside other square wires and creates structured frames. However, it can twist and show misalignment.
Half-round wire has one flat side and one curved side. The flat side sits neatly against a bundle, making it useful for bindings.
Twisted, patterned, and textured wire adds decoration but may leave pressure marks on soft stones.
Start with round dead-soft wire. Change shapes only after learning how the frame behaves.
Common Wire-Wrapping Mistakes
The Stone Slides Out
The cage may not narrow above and below the stone, or one gap may exceed the stone’s smallest dimension.
Reopen the upper binding if possible and reposition the frame wires. Do not add random decorative coils that fail to control the escape path.
The Bail Turns Sideways
The bail may have been formed in the wrong plane or the weight may be uneven.
Before tightening the neck wraps, test the pendant on its intended chain and rotate the bail into alignment.
The Wire Looks Kinked
A kink forms when the bend concentrates at one point.
Use broad finger pressure first, then refine curves with pliers. Nylon-jaw pliers can reduce tool marks.
The Wire Breaks
Repeated bending work-hardens metal.
Avoid straightening and rebending the same section several times. Replace a broken frame wire rather than hiding a weakened join against the stone.
The Crystal Becomes Scratched
Pliers, rough wire, trapped grit, and excessive pressure can mark the surface.
Clean the work mat, use smooth-jaw tools, and inspect the stone before wrapping.
The Pendant Catches Clothing
A cut end, raised spiral, open coil, or rough tool mark may be exposed.
File and tuck every end. Run the pendant gently across scrap fabric before wearing it.
Cleaning and Cleansing a Wire-Wrapped Crystal
A wire wrap combines at least two materials: the stone and the metal.
The more sensitive component determines care.
Do not immerse a pendant merely because copper or Quartz tolerates water. The stone may be porous, the wire may tarnish, and hidden moisture may remain beneath bindings.
The wider water comparison belongs to Which Crystals Can and Can’t Go in Water.
Likewise, avoid leaving coated wire or light-sensitive stones in prolonged direct sunlight. Relevant material limits appear in Which Crystals Can and Can’t Go in the Sun.
For symbolic rituals, sound and intention from How to Cleanse Crystals avoid introducing moisture or residue into the cage.
Wearing the Finished Pendant
Use a chain or cord strong enough for the combined weight of the stone and wire.
Check that the connector passes freely through the bail without forcing it open.
Do not sleep, shower, swim, exercise, or operate machinery while wearing a long wire-wrapped pendant.
Remove it when changing clothes if the design has raised spirals or natural crystal points.
Inspect the bail and bindings periodically. Copper and other soft metals can deform gradually, particularly when the pendant is heavy.
The broader style and wear context belongs to Crystal Necklaces, while symbolic shape interpretations belong to Crystal Shapes and Their Meanings.
Frequently Asked Questions
1. What wire is easiest for a beginner to use?
Twenty-gauge dead-soft round copper wire is forgiving, inexpensive, and strong enough for many medium-sized pendants.
2. How much wire is needed for one pendant?
Three 45–50 centimeter frame wires plus 25–30 centimeters of thin binding wire provide a practical starting amount.
3. Can a crystal be wire wrapped without drilling it?
Yes. A properly shaped cage holds the stone mechanically without a hole, glue, or solder.
4. What is the difference between dead-soft and half-hard wire?
Dead-soft wire bends more easily. Half-hard wire holds shape better but requires more force and is less forgiving during adjustment.
5. Is 20-gauge or 22-gauge wire better?
Twenty-gauge wire provides more structure for medium stones. Twenty-two-gauge wire suits smaller, lighter pieces and tighter curves.
6. Can rough crystals be wire wrapped?
Yes, when the crystal is stable and the wires avoid fragile points, matrix, fractures, and cleavage-sensitive areas.
7. How can I stop the stone from slipping out?
Place supporting wires below its widest point, narrow the cage above it, and keep every gap smaller than the section that could pass through.
8. Can pliers scratch a crystal?
Yes. Keep tool jaws on the wire rather than the stone and use smooth or protected pliers.
9. Should glue be added to the wire wrap?
A well-designed cage should not require glue. Adhesive complicates repairs, cleaning, treatment disclosure, and future removal.
10. Why does copper wire darken?
Copper reacts with the environment and develops tarnish or patina. This does not necessarily mean the wire has become structurally unsafe.
11. How can sharp wire ends be made safe?
Trim with flush cutters, smooth with a file or cup burr, and tuck the end into a protected rear-facing position.
12. Can the finished pendant be washed in water?
Only when the stone, wire, coatings, treatments, glue, and construction all tolerate water. Dry wiping is the safer default.
Conclusion
A successful wire wrap depends on structure before decoration. Support the crystal below its widest point, shape the frame around stable surfaces, bind the top securely, and finish every wire end safely. Once the stone remains secure through a gentle padded-surface test, decorative spirals and weaving can be added without compromising the cage.
Wear eye protection while cutting wire, control every offcut, and keep tool pressure on the wire rather than the crystal. This tutorial covers cold wire forming only; soldering, powered grinding, and stone drilling require additional training and safety controls.